Selling A Vehicle
MotorDesk provides a streamlined vehicle selling process which flows from reservation and invoicing, to handover and reporting.
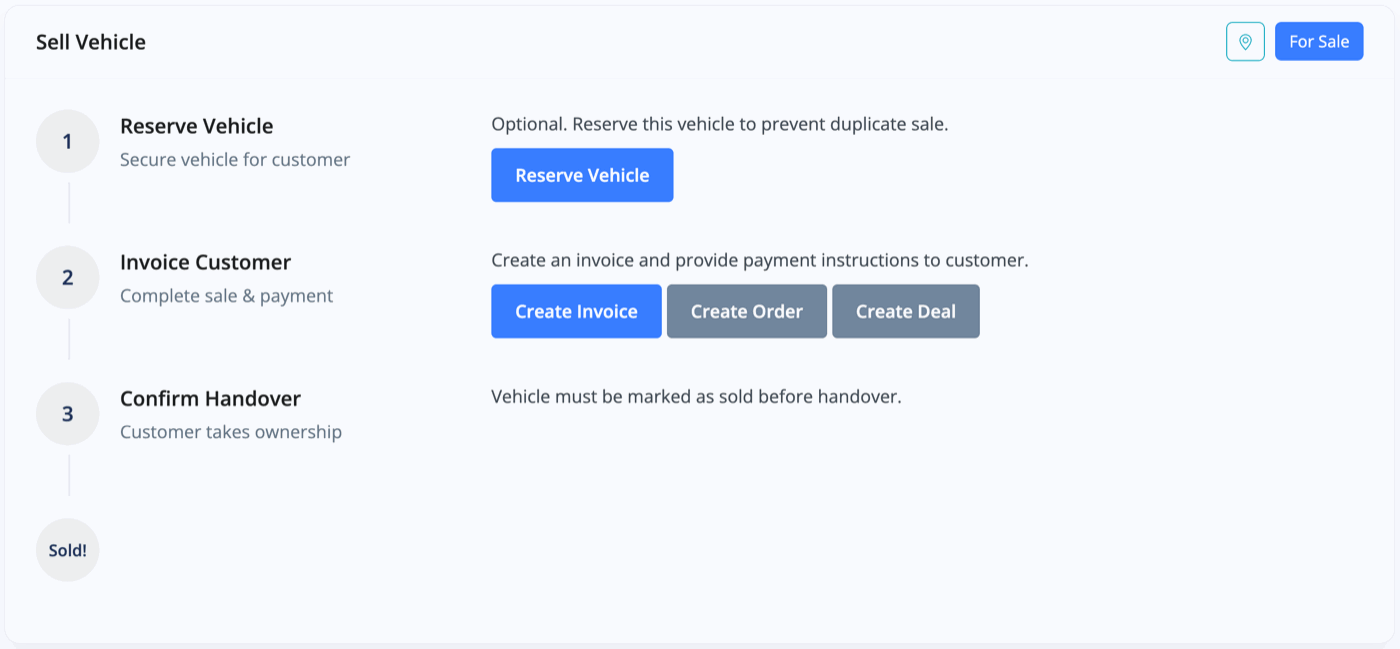
To sell a vehicle go to the vehicle's Sell Vehicle section - this is the bottom link in the menu when viewing a vehicle, or this section can be accessed by clicking the green 'Sell' button shown next to each vehicle in the Vehicles -> Browse Vehicles section.

From the Sell Vehicle section you can choose to first reserve the vehicle, or you may skip this and go immediately to creating an invoice or order. You would reserve a vehicle if you want to prevent it from being sold to a different customer, but this shouldn't be necessary if you expect to immediately invoice the customer. By default the vehicle will be reserved when the invoice is created.
Sales Orders
Orders (optionally called offers, proposals or sales orders) are the same as invoices but without creating the legal sales invoice. Once issued orders can then be converted into invoices - this enables you to create a sales document for the customer to agree to a deal (with optional electronic signature) before creating the sales invoice, this is particularly useful if you use accrual accounting and don't expect to receive payment immediately.
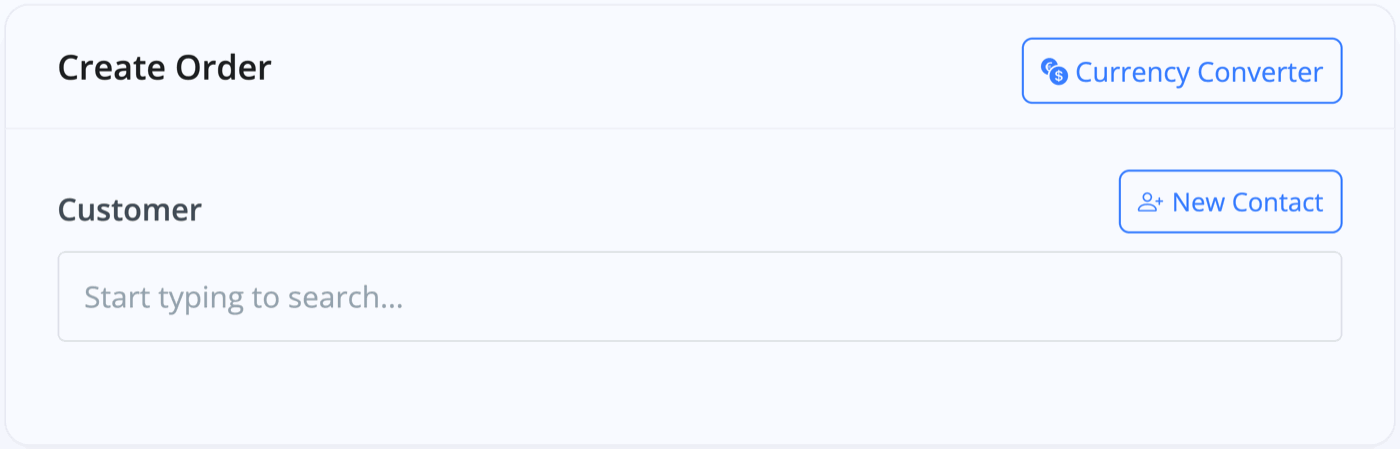
The process for creating an order is the same as for an invoice, but rather than marking it as paid you will convert it to an invoice which will then be marked as paid.
Create Invoice
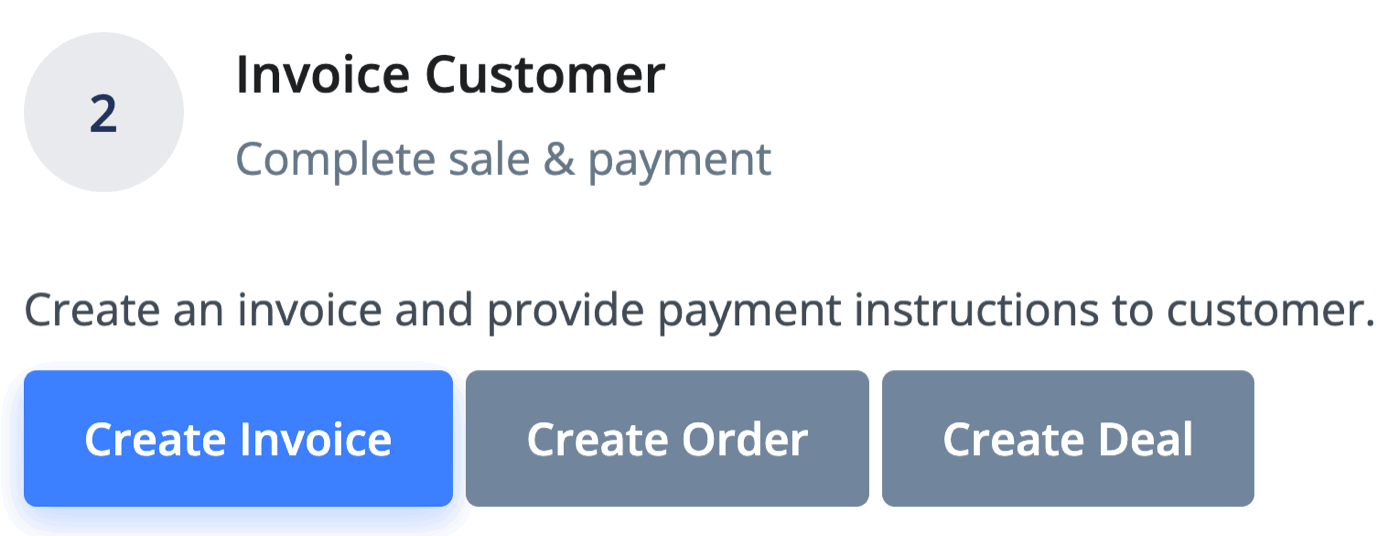
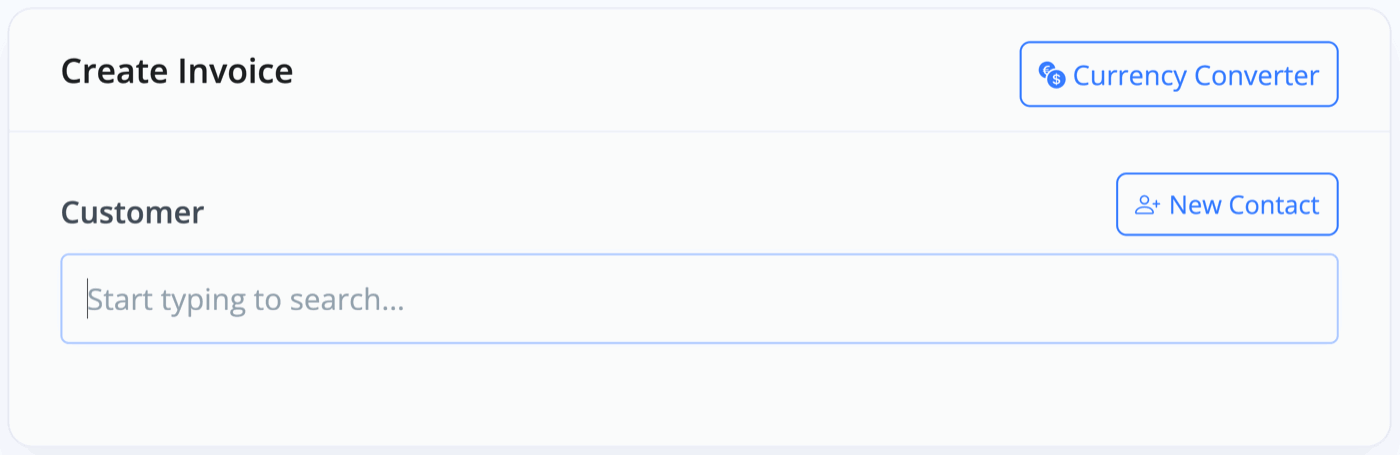
To begin creating an invoice simply select the Create Invoice button and follow the process to search for or add a new customer contact record. You may optionally add a different delivery address if required.
Vehicle, Products, Adjustments & Discounts
Next check the vehicle details and VAT/TAX status, and you can then begin building the invoice by adding any additional products.
Adjustments and discounts can also be added as required. Any products added via the Sales -> Products section will be available to quickly add using the Add Product search tool, or individual products can be added using the Add One-Off Product method.

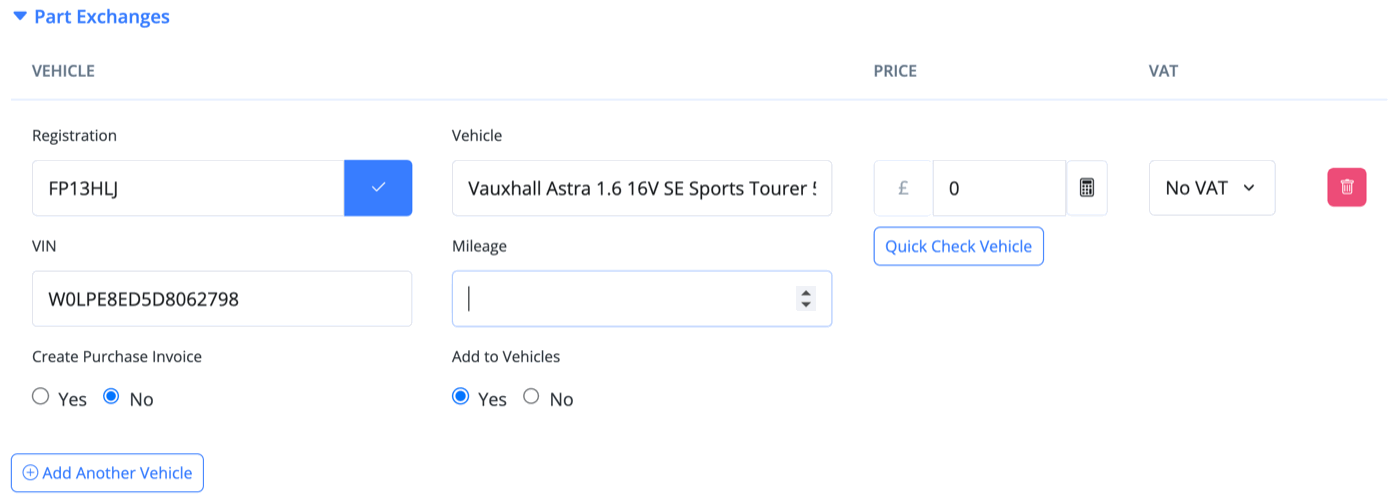
Part Exchanges
Part exchanges can be added by entering the vehicle registration (or VIN in non-VRM countries) and selecting the search button, the vehicle details will then be retrieved - then simply enter the mileage and price. If Create Purchase Invoice is enabled a purchase invoice will be created for the part exchange when the invoice is issued. If Add to Vehicles is enabled the vehicle will be added into stock when the invoice is marked as paid, note you can add it before this by going to the Mark as Paid section and selecting the Add Vehicles Now option - this is particularly useful for Sale or Return (SOR) vehicles.
VAT/TAX & Accounting Codes
Accounting code and VAT/TAX rates can be adjusted depending on your accounting set-up - for example accounting codes are only supported when you have connected accounting software.
Finance
If the customer is using finance select the Finance link to expand the finance options. Three methods of adding finance are provided depending on how the finance provider would like to be invoiced.
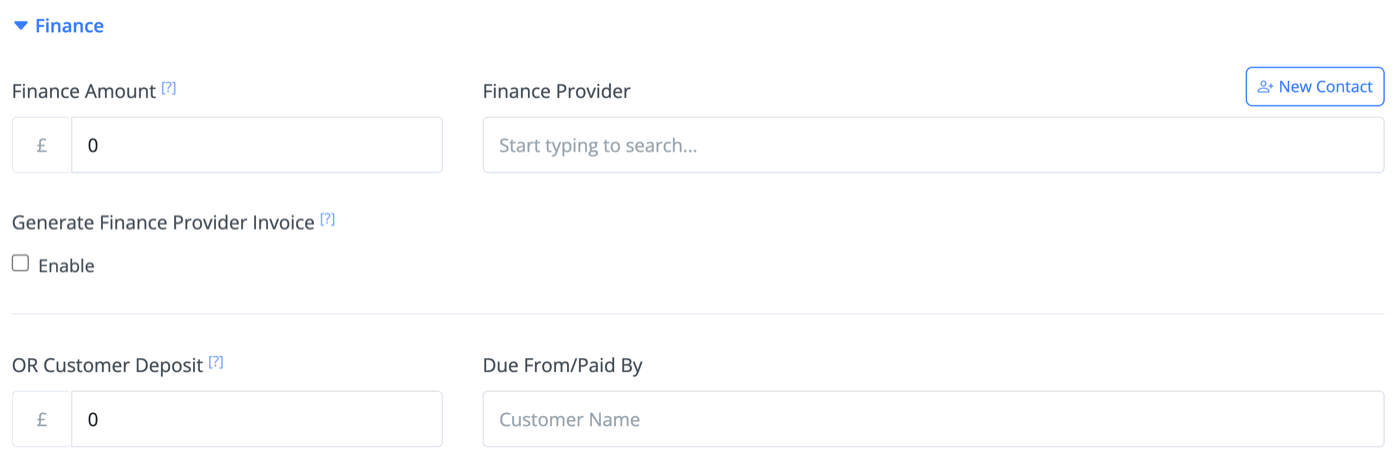
Option 1. Invoice Customer Only
If the finance provider is happy to accept the customer's invoice simply enter the Finance Amount and select/add a Finance Provider contact. The invoice will then be generated for the customer, with the finance amount and provider listed.
Option 2. Invoice Finance Provider Only (not recommended)
You may choose to invoice the finance provider and not the customer, in this case the customer at the top of the Create Invoice form would be set as the finance provider. You may then enter the Customer Deposit and Due From/Paid By name to list the customer and their deposit payment on the invoice.
Option 3. Invoice Both (recommended)
The recommended approach is to follow the instructions for Option 1, but enable the Generate Finance Provider option. In this case you will invoice the customer as per option 1, but when you issue the invoice a second Finance Provider Invoice will be generated - essentially this is like you've completed both option 1 and option 2 simultaneously. Note when you do this both invoices will link to each other at the bottom of the View Invoice section. To complete the sale you only need to mark the customer invoice as paid, the finance provider invoice can be handled separately and marked as paid at a later date as you require.
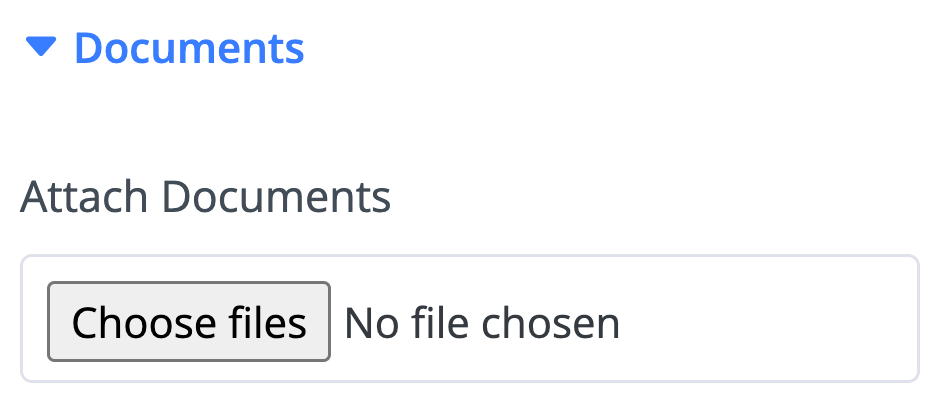
Documents
The documents option can be used to upload and attach any documents you wish to the invoice. If using the electronic invoice method then these documents will be available for the customer to download.
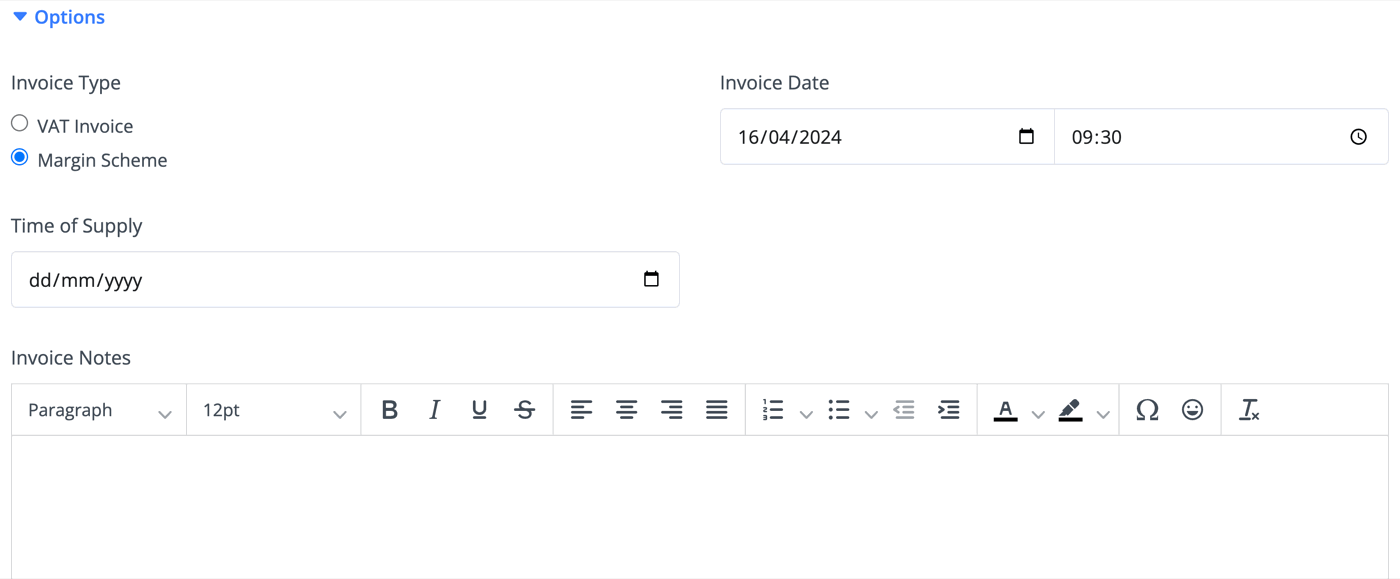
Options
The Options section provides a range of additional fields including the default accounting codes and invoice dates. Invoice notes can be added, and the default terms and conditions can be adjusted. Note, default terms and conditions are set in the Business -> Payments & Invoicing section.
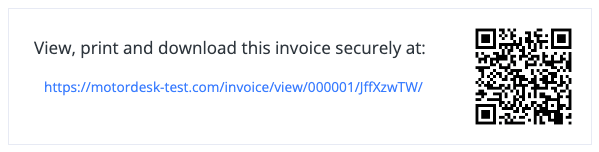
If electronic signatures are enabled then a signature can be added once the invoice is issued. Using the Invoice Options menu shown to the top right of the invoice simply select the 'eSign' option to collect a signature on your device, alternatively you can select the 'Email eSign' option to email the request to the customer, or you can select the 'Share eSign' option to retrieve the invoice URL and QR code.
If you have set-up a card payment provider then the Allow Credit/Debit Card Payment option can be enabled accordingly to show this payment option on your electronic invoice page.
Issue Invoice
Issuing an invoice confirms it is correct and enables you to proceed with sharing the invoice, and marking it as paid. By default the invoice will be created in the connected accounting software when it is issued, rather than when it is first created.

When an invoice is issued the associated purchase invoice and finance provider invoice will be generated. Note, once an invoice is issued some options can not be changed - including the Generate Finance Provider Invoice option.

Mark as Paid
If you have set-up payment methods then customers may pay their invoices via the electronic invoice. Alternatively you can go to the Mark as Paid section to record the customer payments.

Part Payment or Deposit
To record a part payment or deposit simply enter the date, amount and method, and then select the Save option. This will save the changes without marking the invoice as paid and the invoice will then update to show the part-payments and balance to pay.
Mark as Paid
Once all payments have been received select the Mark as Paid option, at this point the vehicle will be marked as sold and will be automatically removed from the sales channels.
Handover
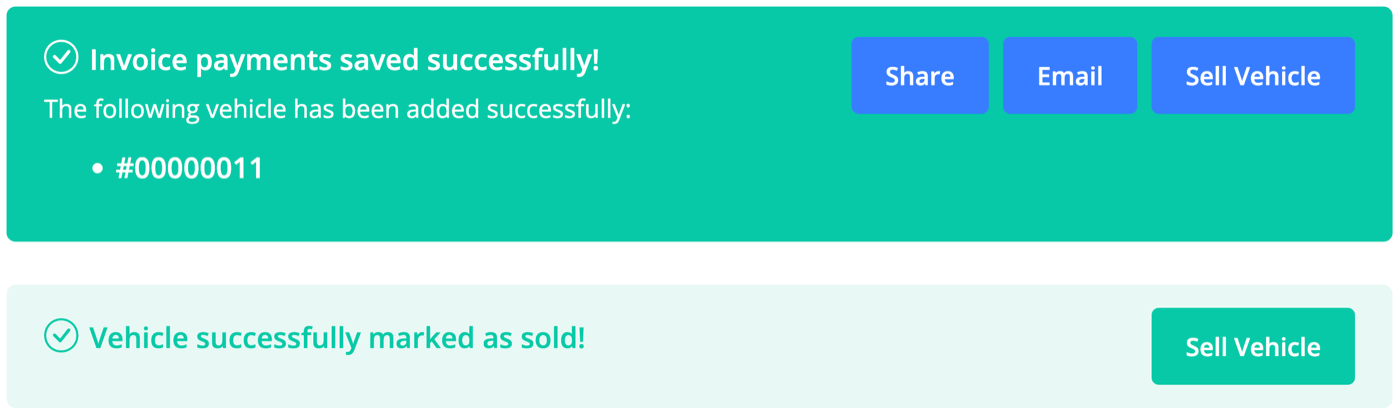
After marking the invoice as paid please return to the Sell Vehicle section and select the Mark as Complete button to indicate the vehicle has been handed over to the customer - the vehicle status will then be shown as Complete.
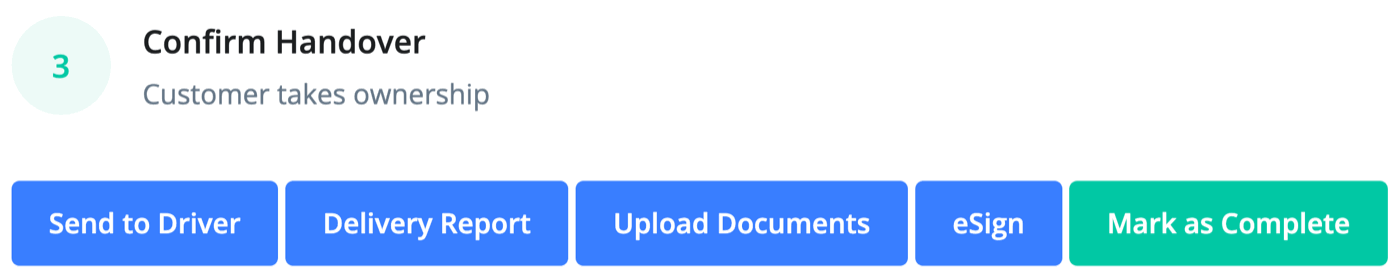
Before handing over the vehicle a range of options are provided including the Send To Driver feature, Delivery Condition Report, Handover eSign, Documents Upload, Commission Recording, Recording of Handover Details and Handover Checklist.
Once handed over a Sale Report is provided giving you a full breakdown of the finance details of the sale.
Related Documentation
Usage Guide
- Account Alerts & Sales Channel Error Notifications
- Adding & Managing Contacts (Customers & Suppliers)
- Adding A Vehicle
- Adding Appointments To Your Calendar
- Adding Pre-Defined Products & Services
- Adding Website Pages & Navigation Links
- Adding Website Tags
- Aftersales Invoices
- AI Lead Assistant
- AI SEO Search Results Explained
- Batch Invoice
- Booking Types & Website Booking Forms
- Branding Your Website
- Browse Vehicles
- Business Contact Details (Telephone & Social Media)
- Business Details (Address, Legal Name & Company Number)
- Business Follow-Ups - Automated SMS & Emails To Customers
- Business Opening Hours (and Holiday Closures)
- Business Social Networks
- Business Users & Roles
- Cancelling A Vehicle Sale or Reservation
- Changing Vehicle Registration (Number Plate)
- Changing Your Membership Plan
- Connecting Finance (iVendi, Codeweavers, CarFinance247 & Evolution Funding)
- Connecting Third-Party Services
- Creating Invoices, Purchase Invoices & Orders
- Customer & Courtesy Vehicles
- Deal Builder
- Display A Different Business Address In MotorDesk
- Displaying Announcements With Website Banners
- Editing Auto-Generated Content In MotorDesk
- Editing Website Pages
- Exporting Business Data
- Filtering Junk Leads
- Handover Process
- Historic Data Viewer
- How MotorDesk Integrates with Sage, Xero & QuickBooks
- How to Add an AA Dealer Promise/Warranty Page
- How To Change Your Website Images
- How To Enable Online Reservations
- Importing Business Data
- Importing Your AutoTrader Stock
- Initial Website Set-Up & Picking A Website Template
- Invoice Customisation
- Membership Payments
- Membership Plans, Data Charges & Payments
- Navigating MotorDesk & Your Dashboard
- OCR (Automatic Invoice Reader) Help
- Remove A Vehicle
- Sales Leads & Chat
- Sales Reports
- Selling A Vehicle
- Selling Multiple Vehicles At Once
- Sending & Signing Documents
- Show Sold Vehicles On Website
- Taking Deposits & Part Payments In MotorDesk
- Un-Publish A Vehicle
- Updating Your Contact Details
- User Profile (Change Email & Password)
- Vehicle Analyser
- Vehicle Appointments
- Vehicle Check
- Vehicle Checklists
- Vehicle Competitors
- Vehicle Condition Reports
- Vehicle Details
- Vehicle Documents
- Vehicle Finance Invoices
- Vehicle History
- Vehicle Image Templates
- Vehicle Images & Videos
- Vehicle Import
- Vehicle Job Boards
- Vehicle Leads & Orders (Leads & Deals)
- Vehicle Locations
- Vehicle Optional Extras, Features & Descriptions
- Vehicle Overview
- Vehicle Photo Background Removal
- Vehicle Purchase & Costs
- Vehicle Quick Check
- Vehicle Reservations
- Vehicle Settings
- Vehicle Silent Saleman
- Vehicle Specification
- Vehicle Stock & Price
- Vehicle Test Drives
- Vehicle Workflows
- Vehicles For Sale Limit Reached
- Vehicles Settings
- Vehicles Stock Book
- Website AI SEO
- Website Banner Settings
- Website Blog Articles
- Website Customer Reviews
- Website Deal Builder Settings
- Website Header & Footer
- Website Live Chat Settings
- Website Settings
- Website Statistics
- Website Valuation Settings
- Website Vehicle Search Result Design