Invoices NEW (Draft)
There are four types of invoices you can create with MotorDesk. Sales Invoices, Purchase Invoices, Finance Provider Invoices, and Aftersales Invoices.
You can use these invoices to sell anything in MotorDesk.
You can also create Orders, which can be optionally renamed as Proposals, Offers, Sales Orders, or Quotes. Orders are the same as invoices, and once issued, can be converted into Sales or After-sales Invoices - they enable you to agree the terms of a sale without raising an invoice. This is particularly useful to offset VAT liability when payment is not expected immediately.
Invoice Views
You have three views where all your invoices and orders are kept.
1. Your Sales Invoices, Finance Provider Invoices, and Aftersales invoices are all kept in your Sales Invoices view via Sales -> Invoices.
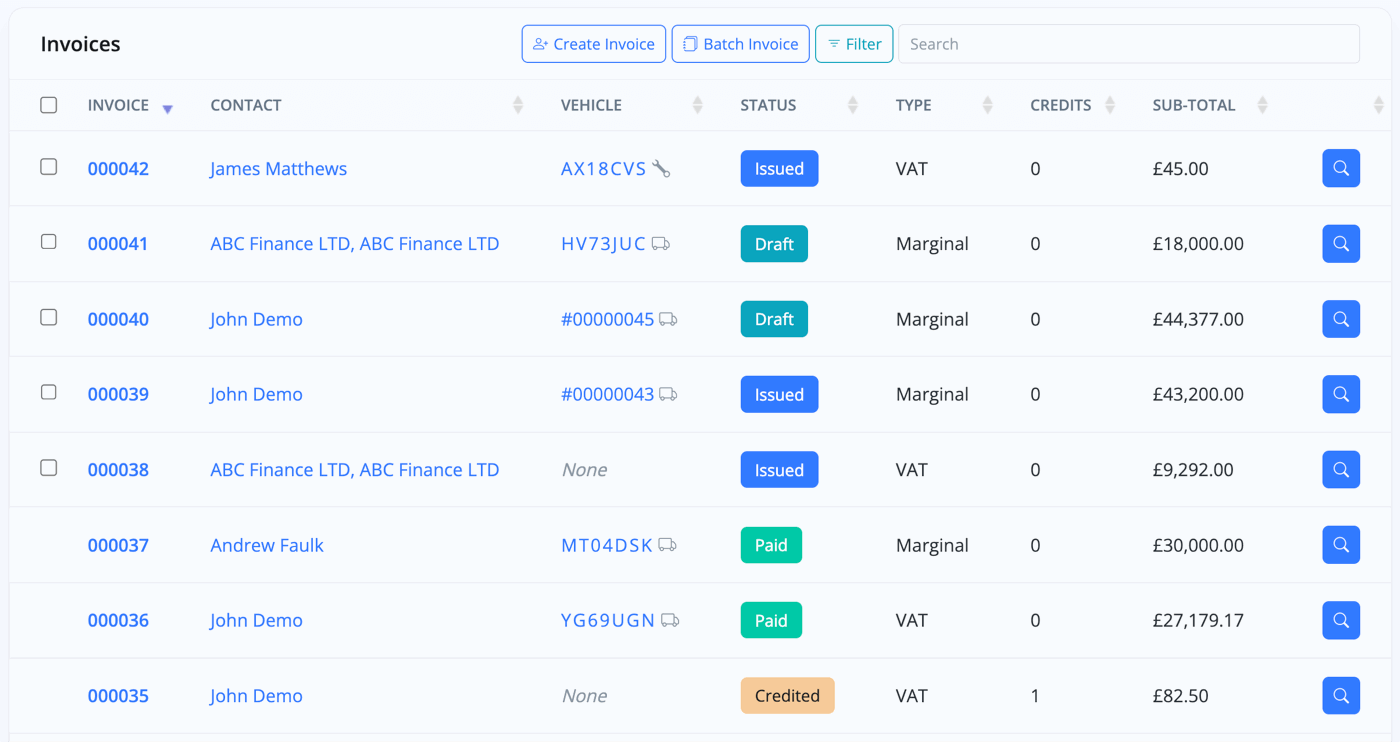
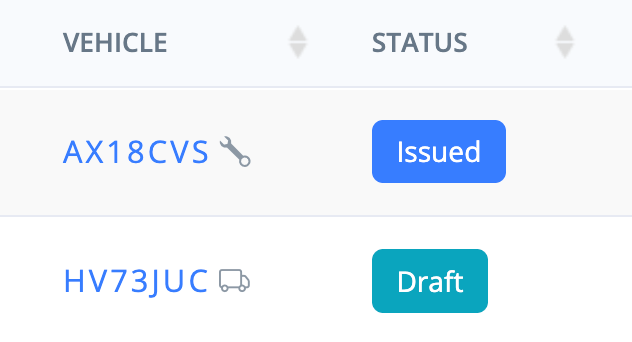
Within this library, Sales and Finance Provider invoices are marked with a truck icon; Aftersales invoices are marked with a wrench icon.
2. Your Purchase invoices are kept in your Purchase Invoice view via Sales -> Purchases.

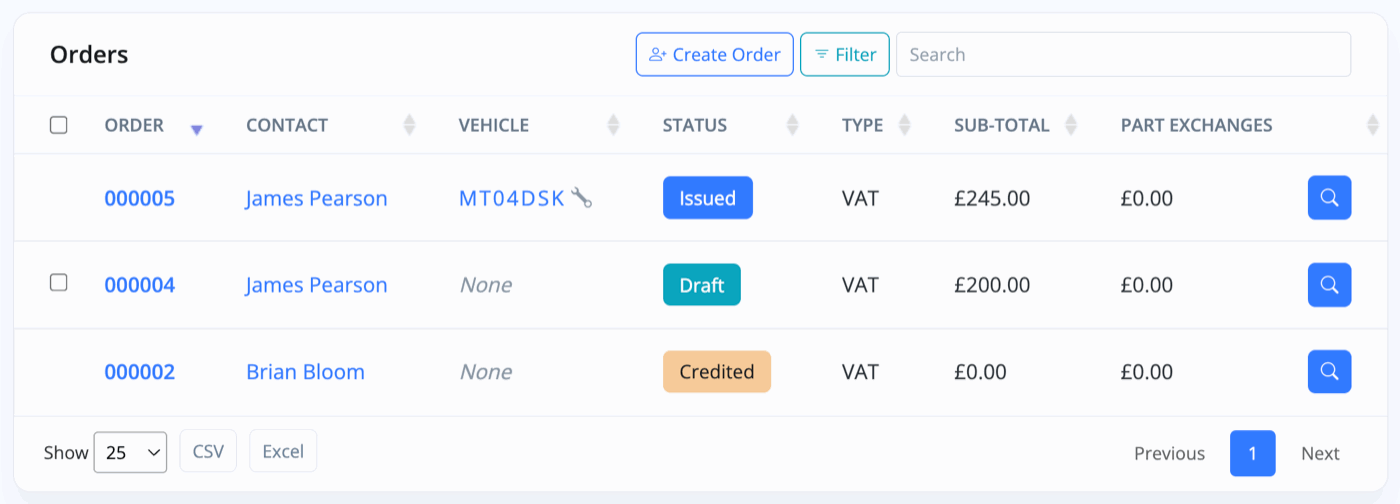
3. Your Orders are kept in your Orders view via Sales -> Orders.
Invoice View Layout
All of your invoices and orders are presented in rows with key information shown in columns.
In any view, click Search or on the actual Invoice/Order Number to view an invoice/order, click a customer name to view their profile in the CRM, and click a vehicle registration to go to that vehicle's 'Sell Vehicle' menu.
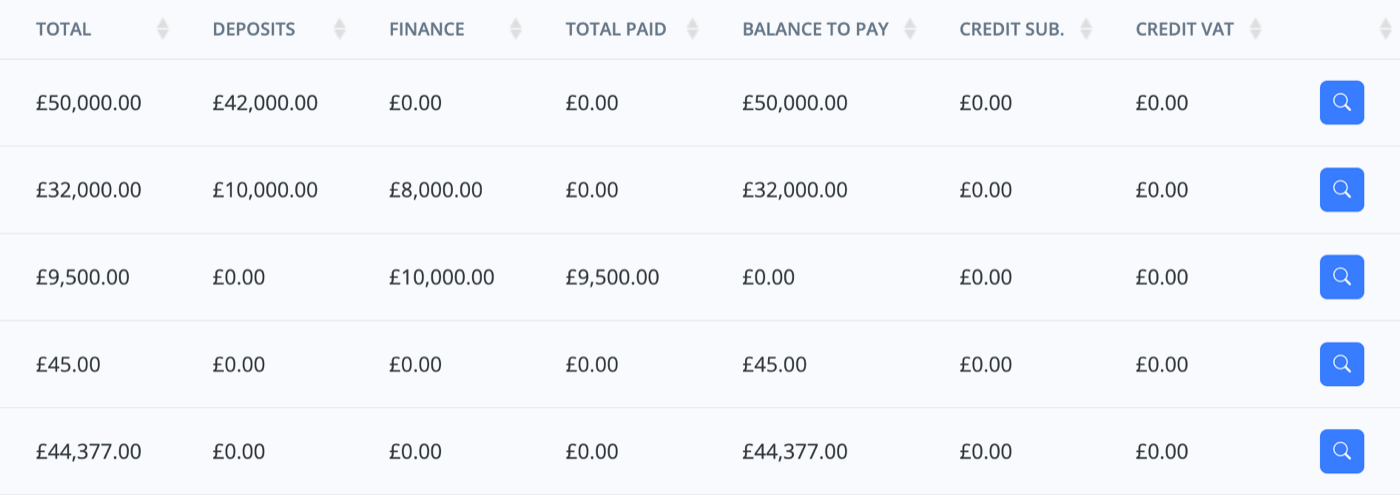
Note: The vehicles table is typically very wide and will have many columns hidden to the right; you can scroll to the right to reveal this data. On a touch device, scroll with two fingers or, using a mouse, hold shift and scroll.
Invoice Statuses
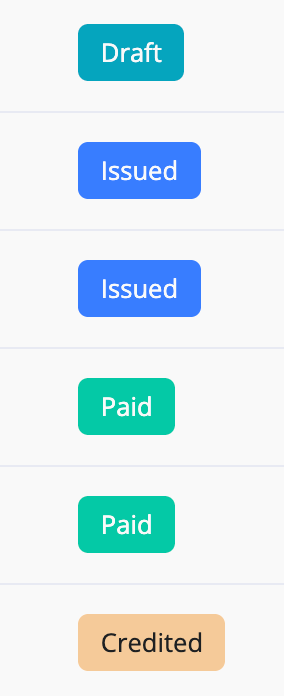
Invoices can have 5 different statuses: Draft, Issued, Paid, Credited, and Cancelled.
Filtering Your Views
Use the Filter to narrow down your search, or the Search Bar to search for a specific invoice.

Creating Invoices & Orders
Press Create Invoice or Create Order to begin to invoice, or raise an order, for any product or service.
Note: If you wish to sell a vehicle, you must create the invoice via the vehicle's 'Sell Vehicle' menu - which we will go through below.
Press Create Purchase to begin to create a purchase invoice for the purchase of a vehicle or product.
Note: You can also generate a purchase invoice for a vehicle and additional costs at the point of adding a vehicle by going to the vehicle's Purchase & Costs menu.

See Creating An Invoice below to see how to navigate making an invoice.
Invoices Attached To Vehicles
As well as Invoice views, you can find all the sales invoices that relate to a specific vehicle in that vehicle's Sell Vehicle menu.
Creating An Invoice
'Sell Vehicle' Method
Not only can you invoice for the vehicle itself from the vehicle menu, you can also add additional products and services to the same Sales Invoice, create a Purchase Invoice for part-exchange vehicles, and create a Finance Provider Invoice for the finance provider on the deal.
When multiple invoices are created using this method, they will all be linked to each other in MotorDesk when viewing any of the invoices individually.

To start, go to the Sell Vehicle menu for the vehicle you wish to sell.

From here, you can press Create Invoice or Create Order (to be converted into an invoice later).

Add A Customer
The first step is to add a Customer - this field will auto-complete based on the customer profiles in your CRM. You can add a New Contact at this point if needed. Change the delivery address at this point if required.
Check/Edit Vehicle Details
Next, check that all your vehicle details are correct. You can edit these at this stage. The options shown will vary depending on whether the vehicle is new or used.

The vehicle will appear as a Product on the invoice, and you're now free to add additional products and services.

Add further Products & Services
You can quickly add a pre-defined product from your Products library.

Alternatively, you can add products and services as a One-Off Product.

Alongside price inputs throughout MotorDesk you'll find a calculator icon on the right hand side of the input, when selected the price input will be automatically updated to deduct the VAT/tax, therefore reversing the VAT calculation. For example, if you were to enter £120 with 20% VAT selected, when you select the calculator icon the price would be updated to £100 to remove the 20% VAT.
Summary Of Sale
Now all your products, services, and the vehicle itself will all be listed together on the invoice.

Accounting Codes
Do note: you can reveal and edit the accounting codes on the invoice by enabling Show QuickBooks/Sage/Xero Item.

Accounting code and VAT/TAX rates can be adjusted depending on your accounting set-up - note, accounting codes are only supported when you have connected accounting software.
Part Exchanges
Now you can begin to add any Part Exchanges, from which you can have MotorDesk generate a Purchase Invoice for you.
Simply add the Vehicle Registration for the vehicle you are trading in. Press the search icon, and it will fill in the vehicle data for you. You can also press Quick Check Vehicle to retrieve valuation data.

Ensure you select Yes under Create Purchase Invoice if you want MotorDesk to create a Purchase Invoice for you.
If you press Add To Vehicles, the vehicle will automatically be added to your stock as a draft.

Before we move on to the Finance section, you can add any price Adjustments or Discounts just below the Part Exchange menu.

Finance
Under the Finance drop-down, you can invoice your Finance Provider. Three methods of adding finance are provided, depending on how the finance provider would like to be invoiced.

Option 1 - Invoice Customer Only
If the finance provider is happy to accept the customer's invoice, simply enter the Finance Amount and select/add a Finance Provider contact. The invoice will then be generated for the customer, with the finance amount and provider listed.
Option 2 - Invoice Finance Provider Only (not recommended)
You may choose to invoice the finance provider and not the customer; in this case, the customer at the top of the Create Invoice form would be set as the finance provider. You may then enter the Customer Deposit and Due From/Paid By name to list the customer and their deposit payment on the invoice.
Option 3. Invoice Both (recommended)
The recommended approach is to follow the instructions for Option 1, but enable the Generate Finance Provider option. In this case, you will invoice the customer as per option 1, but when you issue the invoice, a second Finance Provider Invoice will be generated - essentially, this is like you've completed both option 1 and option 2 simultaneously. Note that when you do this, both invoices will link to each other at the bottom of the View Invoice section. To complete the sale, you only need to mark the customer invoice as paid; the finance provider invoice can be handled separately and marked as paid at a later date as you require.

Make sure you enable Generate Finance Provider Invoice to ensure MotorDesk creates a separate invoice for your Finance Provider.

Any settlement figures can be added as either a One-Off Product, or as an Adjustment, depending on how you would like the figure to be reported in MotorDesk.
Documents
The Documents option can be used to upload and attach any documents you wish to the invoice. If using the electronic invoice method, then these documents will be available for the customer to download.

Invoice Options
The Options section provides a range of additional fields, including the default accounting codes and invoice dates. Invoice notes can be added, and the default terms and conditions can be adjusted.

Note, default terms and conditions are set in the Business -> Payments & Invoicing section.

If Request Electronic Signature is enabled, then a signature can be added once the invoice is issued. Using the Invoice Options menu shown to the top right of the invoice simply select the 'eSign' option to collect a signature on your device, alternatively you can select the 'Email eSign' option to email the request to the customer, or you can select the 'Share eSign' option to retrieve the invoice URL and QR code.

Finish Creating The Invoice
Once you are happy with all the details and options on the invoice, press Create Invoice, and you will be presented with a draft of your invoice, ready to Issue.

Where To Find The Invoice
You will now see this Sales Invoice in your Business -> Sales & Invoices section.

It is also attached to the vehicle in its Sell Vehicle section.

Issuing An Invoice
Now that you've created the Sales Invoice, alongside the Purchase and Finance Provider Invoices, you will need to press Issue Invoiceand follow the processes through to Mark as Complete.
Issue Invoice

Issuing an invoice confirms it is correct and enables you to proceed with sharing the invoice and marking it as paid. By default, the invoice will be created in the connected accounting software when it is issued, rather than when it is first created.

When an invoice is issued, the associated purchase invoice and finance provider invoice will be generated. Note, once an invoice is issued, some options can not be changed - including the Generate Finance Provider Invoice option.
Mark as Paid

If you have set up payment methods, then customers may pay their invoices via the electronic invoice. Alternatively, you can go to the Mark as Paid section to record the customer payments.

Part Payment or Deposit
To record a part payment or deposit, simply enter the date, amount, and method, and then select the Save option. This will save the changes without marking the invoice as paid, and the invoice will then update to show the part-payments and balance to pay.
Mark as Paid

Once all payments have been received, select the Mark as Paid option. At this point, the vehicle will be marked as sold and will be automatically removed from the sales channels.

To confirm the handover of the vehicle to the customer, you must go back to Sell Vehicle and then Mark as Complete.

Aftersales Invoices
To create an Aftersales Invoice linked to a vehicle, instead of going to Sell Vehicle, go to Orders & Invoices. (For Customer or Courtesy vehicles, Orders & Invoices will be the only option anyway).

You can then choose to create an Aftersales Invoice or Aftersales Order.

Cancelling an Invoice
To cancel an invoice, the process depends on whether payment has been taken or not.
If No Payments Were Taken
If no money was exchanged, or if you wish to simply delete the payment record, for example, if it was recorded in error, first, cancel the payments.
To do this, go to Payments when viewing an invoice. Payments are only cancelled if they didn't actually happen.

Then press Cancel, and then Confirm Cancel.


Now, when you view the invoice again, you'll be given the option to cancel the invoice.


If A Payment Was Taken
The payment should be credited accordingly to create the correct accounting records.
Once the invoice is credited, return to the Sell Vehicle section and select the Cancel Sale button. The vehicle will then be returned to the For Sale status.
Finding Previously Cancelled Invoices
Cancelled invoices will remain available in MotorDesk for HMRC compliance, they can be located by adjusting the status filter in the Sales -> Invoices section. Invoice numbers are sequential and can not be reused.
Issue a Credit Note
To issue a credit note, go to Issue Credit, below the invoice you're viewing.

Then enter a credit name and price for the credit note - the credit name may simply be 'Refund', or can be something more specific with a description.

To finish, press Save Credit Note.

Usage Guide
- Account Alerts & Sales Channel Error Notifications
- Adding & Managing Contacts (Customers & Suppliers)
- Adding A Vehicle
- Adding Appointments To Your Calendar
- Adding Pre-Defined Products & Services
- Adding Website Pages & Navigation Links
- Adding Website Tags
- Aftersales Invoices
- AI Lead Assistant
- AI SEO Search Results Explained
- Booking Types & Website Booking Forms
- Branding Your Website
- Browse Vehicles
- Business Contact Details (Telephone & Social Media)
- Business Details (Address, Legal Name & Company Number)
- Business Follow-Ups - Automated SMS & Emails To Customers
- Business Opening Hours (and Holiday Closures)
- Business Social Networks
- Business Users & Roles
- Cancelling A Vehicle Sale or Reservation
- Changing Vehicle Registration (Number Plate)
- Changing Your Membership Plan
- Connecting Finance (iVendi, Codeweavers, CarFinance247 & Evolution Funding)
- Connecting Third-Party Services
- Creating Invoices, Purchase Invoices & Orders
- Customer & Courtesy Vehicles
- Deal Builder
- Display A Different Business Address In MotorDesk
- Displaying Announcements With Website Banners
- Editing Auto-Generated Content In MotorDesk
- Editing Website Pages
- Exporting Business Data
- Filtering Junk Leads
- Handover Process
- How MotorDesk Integrates with Sage, Xero & QuickBooks
- How to Add an AA Dealer Promise/Warranty Page
- How To Change Your Website Images
- How To Enable Online Reservations
- Importing Your AutoTrader Stock
- Initial Website Set-Up & Picking A Website Template
- Invoice Customisation
- Membership Payments
- Membership Plans, Data Charges & Payments
- Navigating MotorDesk & Your Dashboard
- OCR (Automatic Invoice Reader) Help
- Remove A Vehicle
- Sales Leads & Chat
- Sales Reports
- Selling A Vehicle
- Selling Multiple Vehicles At Once
- Sending & Signing Documents
- Show Sold Vehicles On Website
- Taking Deposits & Part Payments In MotorDesk
- Un-Publish A Vehicle
- Updating Your Contact Details
- User Profile (Change Email & Password)
- Vehicle Analyser
- Vehicle Appointments
- Vehicle Check
- Vehicle Checklists
- Vehicle Competitors
- Vehicle Condition Reports
- Vehicle Details
- Vehicle Documents
- Vehicle Finance Invoices
- Vehicle History
- Vehicle Images & Videos
- Vehicle Import
- Vehicle Job Boards
- Vehicle Leads & Orders (Leads & Deals)
- Vehicle Locations
- Vehicle Optional Extras, Features & Descriptions
- Vehicle Overview
- Vehicle Photo Background Removal
- Vehicle Purchase & Costs
- Vehicle Quick Check
- Vehicle Reservations
- Vehicle Settings
- Vehicle Silent Saleman
- Vehicle Specification
- Vehicle Stock & Price
- Vehicle Test Drives
- Vehicle Workflows
- Vehicles For Sale Limit Reached
- Vehicles Settings
- Vehicles Stock Book
- Website AI SEO
- Website Banner Settings
- Website Blog Articles
- Website Customer Reviews
- Website Deal Builder Settings
- Website Header & Footer
- Website Live Chat Settings
- Website Settings
- Website Statistics
- Website Valuation Settings
- Website Vehicle Search Result Design